Ads

This site may use cookies, third-party analytics or an advertising service. By continuing to use this site you are consenting to this use.

This advertising service is crucial to keeping all of my patterns offered for free.

Friday, April 27, 2012

Cute Little Flower Square

Heavily inspired by the Flower Square by Beata Basik  but wanting a smaller square with less holes I decided why not come up with my own. I made a mash up of the flower square by taking the idea of the flower square but using a smaller flower and changing it up a bit. Since my intentions are to use this square for purses/clutches I wanted to make sure it didn't have a bunch of holes where you would be able to see the lining.


For my squares I used 3 colors, center, petals and base. You don't have to use a different color for the center but included in the pattern is when to do the color changes.


Cute Little Flower Square
Ravelry Page for this Cute Little Flower Square - Add it to your library! 

Size - about 2 1/2 inches, you can go up a hook size for a slightly larger square

H hook
Worsted weight yarn

US terms:
ch = chain
sl st = slip stitch
sc = single crochet
dc = double crochet


post stitches = the "bottom" of the stitch, the part that is wrapped around the previous row.
If you bend the petal it tends to make it a bit easier to get your hook into those stitches


Do not work the dc for the petals tightly!! You will get frustrated later when you have to work into the post stitches of the dc!


Make an adjustable/"magic" ring

Round 1: ch 1, and work 4 sc into the ring sl st into first sc to join

If you want the center a different color than switch to the petal color now

Round 2: working into the same st as join * ch 1, 3 dc, ch 1, sl st, then sc into the next st  * on the last petal after you work the sl st go to the next step (5 petals)

You will now be working behind the petals into the post stitches... bend the petal down so you can get to the post stitches
Round 3: * sc into the post stitch of the first dc (in the set of 3) on the next petal, ch 2, sc in the last (3rd) dc on the same petal *   on the last petal after you worked sc into the 3rd dc sl st into the ch 2 space on the next petal to join  (5 ch 2 spaces)

Round 4: * ch 1, 4 dc, ch 1, sl st, then sc in the next ch space * after you sl st into the last petal...(5 petals)

You now want to switch to your base color

Working behind the petals into the post stitches
Round 5: sc into the post stitch of each of the 4 dc on each petal, sl st into first sc to join  (20 sc)

working in just the front loop on each st
Round 6: ch 1, sc into the same st, sc into the next st, * 4 sc in the next, sc in the next 4 sts * sc into the last st, sl st into the first sc to join


You're done!

I would love to hear/see the ways you use this little square so please share! :)


FYI: I'm working on a purse that uses these squares by attaching 4 of them together to make a big square full of flowers (like in the picture below)......so be sure to check back in the next few weeks for that pattern :)

Sunday, April 15, 2012

Fat Owl Bag

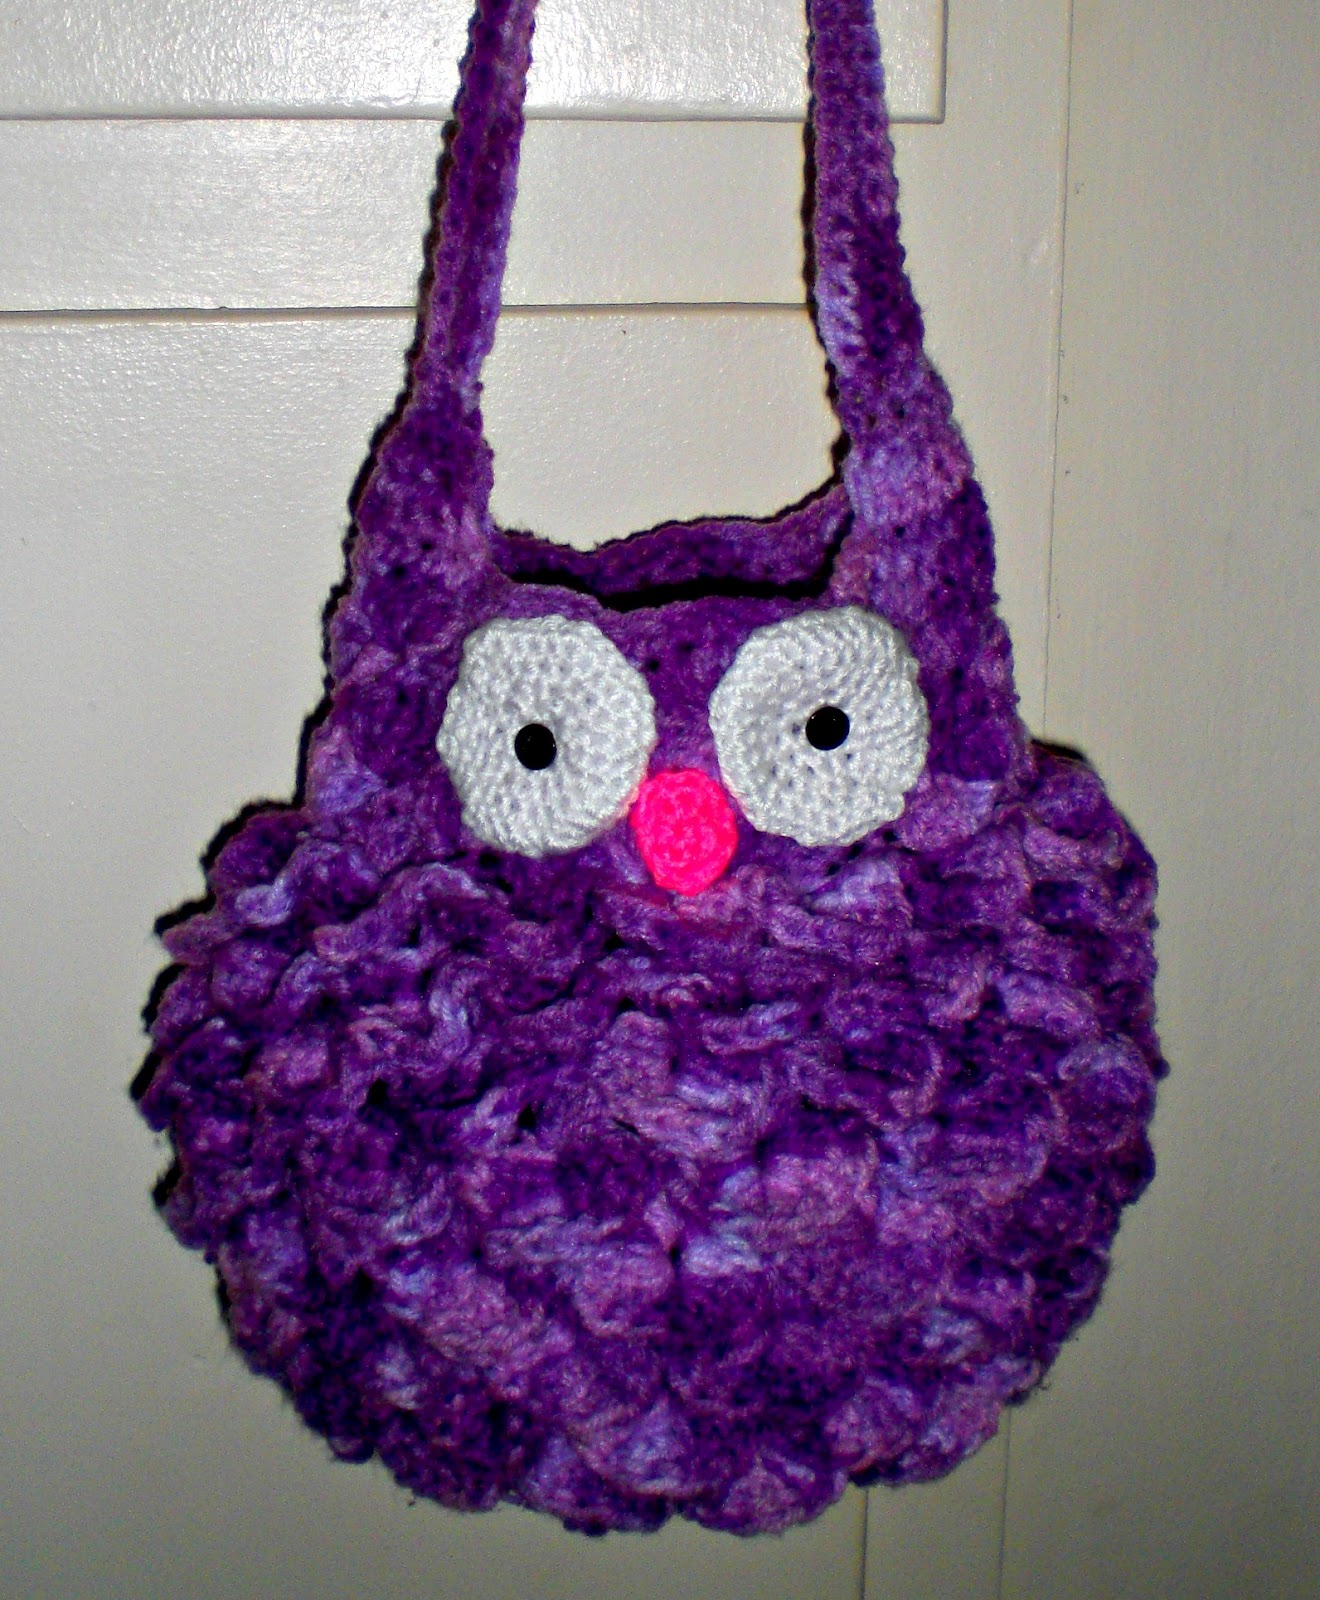
It's a crocodile owl!
I love the look of the crocodile stitch and using it has been on my to do list for a while. It comes out really thick so I know that it wouldn't be good for any spring or summertime garments so I got to thinking how I could use this awesome stitch on an accessory. I have seen the crocodile stitch used on some really cool pieces but unfortunately (with a few exceptions) they are patterns that you have to buy. I love owls, anything with owls on it always catches my eye. I've had the Crocodile Stitch Owl in my Ravelry library for a while as inspiration since it's a pattern that you have to buy. I love the idea of the scales (as I call them) to be used as feathers....genius!

So as I usually do I sat down with some paper a pen and a few inspirational pictures and got to figuring out how I could make a purse that looks like an owl out of this stitch. It was more difficult than I had imagined and I felt like giving up but when I set my mind to something I'm not gonna stop. I made it up and pulled it all out way too many times to count, I could have probably made 5 purses in the time I wasted frogging this project over and over...but it was worth it in the end when it all started working the way I wanted it to.


This purse uses the crocodile stitch, if you are not familiar with this stitch and have never worked it before than take a moment and watch this video I also found this picture tutorial very helpful. Work up a strip, take it apart and work it up again, practice makes perfect. It will save you a lot frustration later down the road when you are working up the pattern and saying wtf does she mean?! There is not much worse than having to frog rows on your piece because you realized you made a mistake it the first few rows. I cannot stress enough that you need to know how to do the crocodile stitch before you start this pattern....you will get very lost and confused if not.


I noticed that while working this up there are many times where if you just stopped at that point you could make something else, when it is still flat I realized that it would make a really really cool hotpad! I'm going to get some cotton yarn and make one! Also once it starts to become a bowl I realized that it would make a cool bowl for yarn balls or other random nick-knacks. Especially if you use a stiffer yarn (like cotton) it would make a great bowl! I wrote in into the pattern where you would want to stop working the steps, for the hotpad but if you wish to make a bowl you have to decide where you would want to stop.


Fat Owl Bag

Add the Fat Owl Bag to your Ravelry library

Terms:

Scale:
Since its called the crocodile stitch because it looks like scales I'm going to refer to them as a scale. The scale is 10 dc around the 2 dc (5 dc around each dc)

Shell:
A shell is made of 5 dc that are all worked into 1 stitch

st = stitch
sts = stitches
ch = chain
sl st = slip stitch
sc = single crochet
dc = double crochet
sc2tog = single crochet decrease


Materials:
Approx. 460 yards of medium worsted weight yarn - recommend using cotton or a stiff acrylic like Red Heart

H hook and medium/worsted weight yarn (I used Red Heart Super Saver, cotton work would great also)


Size of purse:
 12 inches circumference at the widest point/ 24 inches around
Band at the top is 6 inches circumference/ 18 inches around
10-11 inches tall


Make an adjustable ring

Round 1: 10 hdc into the ring, sl st to join

Round 2: Ch 3, dc into same st, * ch 2, 2 dc in next st * sl st into the 3rd chain of starting chain to join


Round 3: Ch 1, work a scale into the first 2 dc, * skip over the next set of 2 dc , work a scale into the next set of 2 dc * don't join   (5 scales)

Round 4: Ch 1, * 2 dc in the  chain space between the scale and the 2 dc, ch 2 work 2 dc into the other chain space between the scale and dc, ch 2, dc into the hole in center of the scale, ch 2 *   Sl st into the top of the last dc in the last scale to join.


 When you dc into the space between the scale and 2 dc: On the very first one in the round it will be very easy to see but as you go around you will have to pull back the scales a little bit so you can get to the chain spaces and stitches behind the scales...they hide back there.


Far chain space: when I use the phrase far chain space I'm referring to the chain space furthest from your hook, not the closest one to where your working but the one on the other side of the 2 dc worked in the previous round


Round 5: Ch 1, * work a scale in the 2 dc, skip the next 2 dc * sl st into the far chain space not the closest one to where your working or to your hook but the one on the other side of the 2 dc worked in the previous round   (7 scales)

Round 6: Ch 3, dc into that same space, * ch 2, 2 dc into the center of the next scale, ch 2, 2 dc in the chain space, ch 2, 2 dc in the next chain space *   at the end of round ch 2 and sl st into the 3rd chain of starting chain to join

After this point you will no longer be working a sl st to join at the end of a round, instead you will just keep continuing spiraling up

Round 7: Ch 1, * work a scale into the set of 2 dc, skip the next set of 2 dc *    at the end of round work 2 dc into the far chain space not the closest one to where your working and to your hook but the one on the other side of the 2 dc worked in the previous round.  (10 scales)

Round 8: * Ch 2, 2 dc in the center of the scale, ch 2, 2 dc in the chain space, ch 2, 2 dc in the chain space * at the end of round stop after you have worked the 2 dc into the last scale

Round 9: * Work a scale in the 2 dc, skip the next 2 dc * at the end of round ch 2 and then work 2 dc the far  chain space - not the closest one to where your working and to your hook but the one on the other side of the 2 dc worked in the previous round       (14 scales-only 14 scales will be worked in each round here and throughout)
- -IF you don't work the last 2 dc into the chain space and sl st , join and fasten off at this point you would have yourself an awesome hotpad!!! Hmm.......idea!


Space in between the 2 dc from the previous round: You will work 2 dc into the space in between the 2 dc from the previous round. Instead of working in the chain spaces like you did on every other round and skipping over the 2 dc you will be working in between those 2 dc. Work the 2 dc like this now and throughout the pattern unless otherwise specified.


Round 10: * 2 dc into the center of the scale, 2 dc in the space between the 2 dc from the previous round... instead of working in the chain spaces like you did on every other round and skipping over the 2 dc you will be work into the space between the 2 dc * at the end of round after you have worked 2 dc in to the center of the last scale stop

Round 11: *  Work a scale into the 2 dc, skip the next 2 dc * stop after you work the last scale 


On the rounds that you set up for the scales...the rounds that you work sets of 2 dc...the very last 2 dc that you will work in space between the 2 dc from the previous round it will be in the "hiding" 2 dc.  You may have to move the scales to get to it..it will be below and behind them. It will be a little lower but once you work the 2 dc into it, it will bring it up to the same level as the other stitches

On the rounds that you work the scales the very last scale will go there (blue arrow)

It will be like this throughout the pattern!!!! You are not stopping rounds you are spiraling upward


Round 12: *  2 dc into the center of the next scale, 2 dc in the space between the 2 dc from the previous round *
 
Round 13: Skip over the first set of 2 dc(the one that was worked into the scale) and * work a scale into the next set of 2 dc,  skip the next 2 dc *

Round 14: *  Ch 1, work 2 dc into the center of the next scale, ch 1, 2 dc into the space between the 2 dc from the previous round  *

Round 15: Skip over the first set of 2 dc(the one that was worked into the scale) and * work a scale into the next set of 2 dc,  skip the next 2 dc *

Round 16: *  Ch 2, 4 dc in the center of the next scale,ch 2, 2 dc into the space between the 2 dc from the previous round  *

Round 17: Ch 2,  Skip over the first set of 4 dc(the one that was worked into the scale) and * work a scale into the next set of 2 dc,  skip the set of 4 dc *  

Round 18: *  Ch 2, 4 dc in the center of the next scale,ch 2, 2 dc into the space between the 2nd and 3rd dc (in the set of 4) from the previous round  *

Round 19: Ch 2,  Skip over the first set of 4 dc(the one that was worked into the scale) and * work a scale into the next set of 2 dc,  skip the set of 4 dc *  

Round 20: *  Ch 2, 4 dc in the center of the next scale,ch 2, 2 dc into the space between the 2nd and 3rd dc (in the set of 4) from the previous round  *

Round 21: Ch 2,  Skip over the first set of 4 dc(the one that was worked into the scale) and * work a scale into the next set of 2 dc,  skip the set of 4 dc *

Round 22: *  Work 2 dc into the center of the next scale, 2 dc into the space between the 2nd and 3rd dc (in the set of 4) from the previous round  *

Round 23: Ch 2,  Skip over the first set of 2 dc(the one that was worked into the scale) and * work a scale into the next set of 2 dc,  skip the set of 2 dc *  

Round 24: *  Work 2 dc into the center of the next scale, 2 dc into the space between the 2 dc from the previous round  *

Round 25: Ch 2,  Skip over the first set of 2 dc(the one that was worked into the scale) and * work a scale into the next set of 2 dc,  skip the set of 2 dc *  at the end of the round sl st into the top of the 1st dc in the next scale

Round 26: You will want to work into the 3rd stitch from the hook, it may be difficult to see....not the stitch that is in the center of the scale but the next stitch, work 5 dc into that stitch,  *  skip 2 stitches and sc in the 3rd st, skip 2 stitches and work 5 dc into the 3rd st.  *  at the end of the round you will sl st into the same st that you ended the last round with

Round 27: Ch 3 (counts as dc), work 1 dc into the same st, sc into the top of the 3rd dc in the shell, work 5 dc into the next sc * at the end of round you will work 3 dc into the stitch you started from. sl st into the next sc (the one at the top of the next shell)

Round 28-29: Repeat last row 2 more times

Round 30: Ch 1, sc in same stitch, sc in each stitch around, at the end of round sl st into the ch 1 you made at beginning of round


Ears/Straps:

Count in the direction that you are working.....count 16 stitches from where your hook is and mark that stitch, count 10 more stitches and mark the 11th stitch. Count 16 more stitches and mark that 16th stitch.

Turn your work so you are working the opposite direction that you have been working. ch 1 and sc in the next 10 stitches..you should be right next to the marker stitch, turn

Ch 1, sc in the first st, sc2tog, sc in the next 4 stitches, sc2tog, sc in the last st, turn

Ch 1, sc in the first st, sc2tog, sc in the next 2 stitches, sc2tog, sc in the last st, turn

Ch 1, sc in the next 2 stitches, sc2tog, sc in the next 2 stitches, fasten off

Attach yarn to where the 16th stitch marker is, ch 1 and work sc in the next 10 stitches, you should be right next to the other marker stitch, turn

Ch 1, sc in the first st (the same one you attached the yarn into), sc2tog, sc in the next 4 stitches, sc2tog, sc in the last st, turn


Ch 1, sc in the first st, sc2tog, sc in the next 2 stitches, sc2tog, sc in the last st, turn


Ch 1, sc in the next 2 stitches, sc2tog, sc in the next 2 stitches

Chain 50-70... I chained 50 but if you would like a longer strap than you can chain more
Make sure you do not twist the chain!!

Attach the chain with a sl st into the other side, after you attach sc into the next stitch, turn

Work your way across the chain and at the end of the strap work a sc into the stitch on the other side (make sure it's the 2nd stitch inward not the 1st), turn

Work sc across the strap, work a sc into the stitch on the other side
Repeat 5 more times. By the end of working the strap the 5 stitches on both sides where the "ears" were made have the strap attached. On the last row sl st in the last stitch instead of sc. Fasten off.


I put a face on just one side of my purse, if you wish to have a face on both sides than make 4 eyes and 2 beaks.

Eyes: Make 2
For the eyes you will want to make a flat circle. You wish to do the eyes differently (different hook size, yarn weight) just make sure it measures to 2 1/2 inches big.
Using a G hook/medium weight yarn

Chain 2.
Rnd 1: 6 sc in 2nd ch from hook. Sl st in first sc, to join.
Rnd 2: ch 1, 2 sc in ea sc around. Sl st in first sc, to join.
Rnd 3: ch 1, * sc in next sc, 2 sc in next sc * around. Sl st in first sc, to join.
Rnd 4: ch 1, * sc in ea of next 2 sc, 2 sc in next sc * around. Sl st in first sc, to join.
Rnd 5: ch 1, * sc in ea of next 3 sc, 2 sc in next sc * around. Sl st in first sc, to join.
Leave the tail long so you can use it to attach the eye to the piece.

Beak:  Make 1

I've been going back and forth of how to work the beak of the owl so if you have a way that you like best feel free to use that way. This is how I did mine:
Using a G hook
Ch 2
Sc in to the first ch twice.
Flip/turn your work and ch one.
Sc into each stitch of the last row, there should be 3 sc in this row.
Ch one then again flip your work and sc into each stitch of the previous row, there should now be 4 sc.
 I worked a sl st into each st around the border...you don't have to do this if you don't want to. Personally I don't like the triangle beaks, I prefer a shape that is similar to a guitar pick.


Lining the purse:
This bag needs a lining because of the scales there are holes in between so most likely some small items would fall out. I'm having trouble deciding the best way to line this bag. I wanted to have the pattern complete before I posted it but....I thought maybe it would be best to get some feedback on how to line this purse.

I found a tutorial that instructs you to measure the size the width of the piece and cut out 2 pieces of fabric and sew the together down the sides, which I think seems like the best solution.

If you have any better ideas please let me know


Enjoy!

Tuesday, April 10, 2012

Kush Shrug

 I love shrugs! Leggings and a tunic with some added flair is a typical outfit for me so I love cute shrugs or vests to jazz up and outfit. I previously made the Simple Shrug by Lion Brand Yarn in black and I love it. It's a simple pattern where you work up a big rectangle made of rows of dc's and sew together the sides to make a cozy shrug. I decided to take that idea and change it up quite a bit. I'm also working on a light and airy daisy motif shrug but that still needs some work (and blocking) so that one is soon to come.... but is sure to be a showstopper. But for now we will just dive into how to make this shrug, I am so excited to share this pattern with you guys!!!

Crochetpatterncentral.com picked up this pattern and put it in their library :)


I love the colors in this yarn!

This is a great pattern to use a self striping or ombre yarn with. You could also take this pattern and make a small rectangle and sew the sides to make a cropped version like many other smaller shrug/boleros.

This pattern may look slightly confusing but it is pretty simple I just would rather over explain that not give enough information.

Hook and yarn:
You can use any hook and size because you adjust how many sets you need according to the size of your sets. I recommend an H hook and medium worsted acrylic blend yarn but you can use what you like best. But be careful with cotton yarns because you want this piece to have some stretch and flow to it and cotton tends to be a little less flexible.

Button:

How big is the button you plan on using? This is very important when it comes to how many to chain for your button hole. I recommend doing a quick small square of hdc using the appropriate ch size (below) for your button you make sure it fits through but doesn't have to much space to where it will slip out. The button I used is the double quarter size (double the size of a quarter), as you can see in the example pictures.
Quarter size - ch 1 and skip 1 st
Double quarter size/large - ch 2 and skip 2 sts

Measurements:
You need to determine how big to make the rectangle for your shrug. Grab a measuring strip, a pen and paper.  Determine the middle point between your elbow and shoulder, now go about an inch above that. That is what I am going to refer to as the top of your arm.

#1. Measure from the top of your arm spot across your shoulders to that same spot on your other arm. Write that measurement down as #1. 
#2.  Measure from the top of your shoulders down your back to about 5 inches above where you want the piece to stop. (the band will accommodate for those extra 5 inches) Write that measurement down as #2.
#3. Measure from the top of your shoulder down to the top of your arm spot. Write that measurement down as #3. 

You will need to determine how many "sets" you will need to achieve the size needed according to measurement #1.

Sets:
Each "set" is made of 5 dc's + ch 1 space. Do a test strip with your yarn and hook of choice. Measure the length of your set, you don't need to worry about the height of the set.


I used a H(5mm) Hook and worsted weight yarn and my "sets" are each 2 inches long. For example, on my shrug I put a total of 10 sets + the last  5 dc's so the piece is 21 1/2 inches wide.

The reason I'm making it confusing with the sets is so you can use any hook size and yarn you choose without it affecting the size of the garment. 


The multiple is 6   then + 5 (for last set of dc's)  and + 2 (for starting dc)

Example:
If your "sets" are 2 inches long and you want your piece to be about 22 inches you will need 10 sets + the last sets of 5 dc's
So you would need to chain 67
( 6x10=60 +5 +2=67 )


Kush Shrug
Ravelry page for the Kush Shrug - Add it to your library!


I used an H(5mm) Hook and a medium worsted weight soft acrylic blend yarn which is what I recommend but you can use other sizes (as explained above)

I used approx 600 yards/10.5 oz for mine but it will vary depending on how large or small you make your shrug
In the pattern I use the term "very first stitch

st = stitch
sts = stitches
ch = chain
sl st = slip stitch
hdc = half double crochet
dc = double crochet


Main piece:

Repeat from * * across
Chain ____ (according to your calculations)
Row 1: dc in 3rd ch from hook, dc in next 3, * ch 1 skip 1 st, dc in next 5 *
Row 2: ch 3 dc in very first, dc in next 4 * ch 1 skip 1 st, dc in next 5 * ch 1 skip 1 st, dc in last 4
Row 3: ch 3 dc in very first, dc in next 2 * ch 1 skip 1 st, dc in next 5 *ch 1 skip 1 st,  dc in last 6
Row 4: ch 3 dc in very first, dc in next 5 * ch 1 skip 1 st, dc in next 5 * ch 1 skip 1 st, dc in last 3
Row 5: ch 3 dc in very first, dc in next st * ch 1 skip 1 st, dc in next 5 * ch 1 skip 1 st, dc in last 7
Row 6: ch 3 dc in very first, * ch 1 skip 1 st, dc in next 5 * ch 1 skip 1 st, dc in last 2
Row 7: ch 3 dc in very first, * ch 1 skip 1 st, dc in next 5 * ch 1 skip 1 st, dc in last 2
Row 8: ch 3 dc in very first, dc in next st * ch 1 skip 1 st, dc in next 5 * ch 1 skip 1 st, dc in last 7
Row 9: ch 3 dc in very first, dc in next 5 * ch 1 skip 1 st, dc in next 5 * ch 1 skip 1 st, dc in last 3
Row 10: ch 3 dc in very first, dc in next 2 * ch 1 skip 1 st, dc in next 5 * ch 1 skip 1 st, dc in last 6
Row 11: ch 3 dc in very first, dc in next 4 * ch 1 skip 1 st, dc in next 5 * ch 1 skip 1 st, dc in last 4
Row 12: ch 3 dc in very first, dc in next 3 * ch 1 skip 1 st, dc in next 5 * ch 1 skip 1 st, dc in last 5
Row 13: ch 3 dc in very first, dc in next 3 * ch 1 skip 1 st, dc in next 5 * ch 1 skip 1 st, dc in last 5
Repeat rows 2-13 until piece reaches the size according to measurement #2
Do not tie off! But you do want to weave in the end from the beginning.

Trim:

 Once you finish making your piece lay it flat and take the side with the yarn still attached and fold it over according to however many inches you have for measurement #3. Make sure it is even on both sides, mark that spot on both sides.

when working down the sides


Slip stitch into the stitch you marked (to join)
Ch 2, turn so your are working across the top/neck/short side work hdc into each st across when you get to the end sl st into the other marker stitch to join.

hdc into that same stitch, *2 hdc in the next st, hdc in the next st, 2 hdc in the next st *
When you get to the end of the side work 3 hdc into the corner stitch  Repeat between ** across

hdc in each stitch across, at the end of the bottom side work 3 hdc into the corner stitch

Work up the side the exact same way as you did the other side. (2 hdc into next st, 2 hdc in next st, hdc in next st)  sl st to join in the ch 2 (the one you made right after you joined the first sides)

From here on out you will be working in rounds.
Round 1: Ch 2, hdc in each st around, sl st into ch 2 to join
Round 2: Repeat last round
Round 3: Repeat last round

Stop and try on the piece, while you have it on locate your "solar plexus"/celiac plexus, that's the area where your ribs come to a v in the center or your chest...right in the middle near of the bottom of your boobies. Pull both the sides together so they meet up at your plexus, that is where you will want to put the button. You may have to tug on it a bit to get it to meet which is normal because the piece will stretch more once worn. If it is too tight and you cannot get it to meet even when stretched a bit than do a few more rows of hdc. Mark those stitches on both sides but make sure they are even. It is helpful if you mark them then take off the piece and count the rows from the bottom up so you are sure they are even. You can either add just one button (like I did), add 2 buttons or add buttons all the way down, whatever you prefer.

Round 4: ch 2, hdc in each st, when you get the the marked stitch stop
chain 1 and skip 1 st - small button or chain 2 and skip 2 sts - large button
whichever depending on your button size then hdc into the next stitch and continue working around, when you get to the next marker just keep going but leave that marker in that spot to refer to later. at the end of round sl st to join.

Round 5: ch 2, work hdc in each st around (including chain for button hole) sl st to join
Round 6: ch 2, hdc in each st around, sl st to join
Round 7: ch 2, hdc in each st around, sl st to join

Trim on sleeves:

You will now want to attach the yarn into the "armpit", attach into the same stitch where you joined the sides together. Ch 2 and hdc into the same st, hdc in the next 2 sts, * work 2 hdc in the next st, hdc in the next, 2 hdc in the next st * (the same way you did the sides) sl st to beginning ch 2 to join
Ch 2 and hdc in each st around, tie off
Do the other sleeve the same way

Attach the button in the stitch that you marked earlier. weave in all the ends and you're done!


Monday, April 9, 2012

The "Fat Bag"...Even Fatter! My new favorite purse!

Ever since I first learned to crochet I have seen pictures of this awesome purse that I knew I wanted to make, unfortunately when I went to find the pattern I found a chart or instructions in a language I don't understand. Luckily after some searching I found this great tutorial by Bend Beanies on how to make the "Fat Bag".


Original design "Fat Bag" by Samanta Maragno

CLICK on the image to make it bigger
The chart is the original design, "Bend Beanies" edited the pattern by adding extra rows. The first one I made I made was according to Bend Beanies edits. I was happy with it but I personally like a very deep purse and I felt like my stuff was going to fall out of it if I bent down so I sat down and figured out how to make it the way I want it. I sketched it out and worked it up and I am extremely happy with the results. The first day I was wearing it I was at JoAnns and got complimented by some fellow crocheters in the yarn isle!


One thing that I think made my purse pop was that I used 2 different ombre yarns. Both were Lily's Sugar and Cream and both had 2 common colors. (shades named Moondance & Beach Ball Blue) I switched the yarns after every 2 rows. The common colors of these 2 yarns were white and light blue. I highly recommend using Sugar and Cream because they have a great selection of self striping/ombre yarns and the stiffness the cotton provides is perfect for this purse. I added a few rows of just white cotton in the middle rows of the strap so it has colored "borders".

The changes I made are simple, normally you start by working 5 hdc on each side of the increase and stop increasing at 18 on each side. With my edit you start with 7 on each side of the increase and stop increasing at 24 on each side. The other change I made is that when you are working the straps you work some decreases.


Ravelry page for this fatter fat bag - Add it to your library!

Fatter "Fat Bag"

H Hook
Uses approx. 350 yards, it depends on how long and wide you make the straps

sl st= slip stitch
sts=stitches
st=stitch
sc= single crochet
hdc= half double crochet
hdc2tog= half double crochet decrease
hdc increase= 2 hdc's into one stitch

All turning chain 2 count as a hdc

Chain 23
hdc into the 3rd chain from the hook, hdc in next 6 sts., 2 hdc in next st., hdc in next 5, 2 hdc in next st, hdc in next 7
ch 2, hdc in next 7 sts., 2 hdc in next st., hdc in next 5, 2 hdc in next st, hdc in next 8 sts, turn
ch 2, hdc in next 8 sts., 2 hdc in next st., hdc in next 5, 2 hdc in next st, hdc in next 9 sts, turn
ch 2, hdc in next 9 sts., 2 hdc in next st., hdc in next 5, 2 hdc in next st, hdc in next 10 sts, turn
ch 2, hdc in next 10 sts., 2 hdc in next st., hdc in next 5, 2 hdc in next st., hdc in next 11 sts, turn
ch 2, hdc in next 11 sts., 2 hdc in next st., hdc in next 5, 2 hdc in next st, hdc in next 12 sts, turn
ch 2, hdc in next 12 sts., 2 hdc in next st., hdc in next 5, 2 hdc in next st, hdc in next 13 sts, turn
ch 2, hdc in next 13 sts., 2 hdc in next st., hdc in next 5, 2 hdc in next st, hdc in next 14  sts, turn
ch 2, hdc in next 14 sts., 2 hdc in next st., hdc in next 5, 2 hdc in next st, hdc in next 15 sts, turn
ch 2, hdc in next 15 sts., 2 hdc in next st., hdc in next 5, 2 hdc in next st, hdc in next 16  sts, turn
ch 2, hdc in next 16 sts., 2 hdc in next st., hdc in next 5, 2 hdc in next st, hdc in next 17 sts, turn
ch 2, hdc in next 17 sts., 2 hdc in next st., hdc in next 5, 2 hdc in next st, hdc in next 18  sts, turn
ch 2, hdc in next 18 sts., 2 hdc in next st., hdc in next 5, 2 hdc in next st, hdc in next 19 sts, turn
ch 2, hdc in next 19 sts., 2 hdc in next st., hdc in next 5, 2 hdc in next st, hdc in next 20  sts, turn
ch 2, hdc in next 20 sts., 2 hdc in next st., hdc in next 5, 2 hdc in next st, hdc in next 21 sts, turn
ch 2, hdc in next 21 sts., 2 hdc in next st., hdc in next 5, 2 hdc in next st, hdc in next 22 sts, turn
ch 2, hdc in next 22 sts., 2 hdc in next st., hdc in next 5, 2 hdc in next st, hdc in next 23 sts, turn
ch 2, hdc in next 23 sts., 2 hdc in next st., hdc in next 5, 2 hdc in next st, hdc in next 24 sts, turn
Work hdc across in each stitch for 24 rows (you can add extra rows if you would like)
ch 2, hdc in next 23 sts, hdc2tog, hdc in next 5 sts., hdc2tog, hdc in next 24 sts, turn
ch 2, hdc in next 22 sts, hdc2tog, hdc in next 5 sts., hdc2tog, hdc in next 23sts, turn
ch 2, hdc in next 21 sts, hdc2tog, hdc in next 5 sts., hdc2tog, hdc in next 22 sts, turn
ch 2, hdc in next 20 sts, hdc2tog, hdc in next 5 sts., hdc2tog, hdc in next 21 sts, turn
ch 2, hdc in next 19 sts, hdc2tog, hdc in next 5 sts., hdc2tog, hdc in next 20 sts, turn
ch 2, hdc in next 18 sts, hdc2tog, hdc in next 5 sts., hdc2tog, hdc in next 19 sts, turn
ch 2, hdc in next 17 sts, hdc2tog, hdc in next 5 sts., hdc2tog, hdc in next 18 sts, turn
ch 2, hdc in next 16 sts, hdc2tog, hdc in next 5 sts., hdc2tog, hdc in next 17 sts, turn
ch 2, hdc in next 15 sts, hdc2tog, hdc in next 5 sts., hdc2tog, hdc in next 16 sts, turn
ch 2, hdc in next 14 sts, hdc2tog, hdc in next 5 sts., hdc2tog, hdc in next 15 sts, turn
ch 2, hdc in next 13 sts, hdc2tog, hdc in next 5 sts., hdc2tog, hdc in next 14 sts, turn
ch 2, hdc in next 12 sts, hdc2tog, hdc in next 5 sts., hdc2tog, hdc in next 13 sts, turn
ch 2, hdc in next 11 sts, hdc2tog, hdc in next 5 sts., hdc2tog, hdc in next 12 sts, turn
ch 2, hdc in next 10 sts, hdc2tog, hdc in next 5 sts., hdc2tog, hdc in next 11 sts, turn
ch 2, hdc in next 9 sts, hdc2tog, hdc in next 5 sts., hdc2tog, hdc in next 10 sts, turn
ch 2, hdc in next 8 sts, hdc2tog, hdc in next 5 sts., hdc2tog, hdc in next 9 sts, turn
ch 2, hdc in next 7 sts, hdc2tog, hdc in next 5 sts., hdc2tog, hdc in next 8 sts, turn
ch 2, hdc in next 6 sts, hdc2tog, hdc in next 5 sts., hdc2tog, hdc in next 7 sts
fasten off and weave in the ends

I had an old Ed Hardy scarf that I was able to upcycle it and use it to line my purse, which I think is a great compliment to the other colors.

Lining the purse:
I highly recommend lining this purse, you don't have to but I think you should.
The Bend Beanies tutorial is great for lining the purse and starting the band and straps so use that. They provide lots of pictures and a great detailed explaination. But remember that you want to really squoosh the piece together and do the first band row (working into the turning chains) tightly.. the tighter the more the pleats will stand out. Their directions are correct..do not do that row loosely! So pop over there and then once your ready to do the first row on the straps (after you've done the chains) you can follow the direction below.

After you've worked up the "band" and started the straps by working the chains and now you're back to where you first attached the yarn for the straps.
Find the 5 stitches that were worked in the middle between the increases/decreases and mark the stitches next to them so you can use these 5 stitches as a reference for the center.
sc around in each stitch
decrease, sc, decrease into the 5 stitches between the markers
3 decreases centered above the markers
2 decreases centered above the markers
1 decrease centered above the markers
sc around in each stitch
If you want super wide straps than do more rows of sc
fasten off and weave in the ends :)

My colorful Fat Bag!